USER GUIDE | ITASCA: LEGATO VIOLINS
Table Of Contents
A. IntroductionB. Basic Installation
C. How ITASCA Works
D. Additional Controls
E. Keyswitch Functionality
A. Introduction
ITASCA: Legato Violin works with Kontakt version 6.7.1 or higher.B. Basic Installation of ITASCA: Legato Violin
STEP 1 : Download the .zip file containing ITASCA and extract it to a desired location on your computer's drive.STEP 3 : Locate the file ITASCA_LegatoViolin.nki and execute it by either double-clicking or drag-dropping it onto Kontakt's main Rack area(typically the right pane of the Kontakt interface). ITASCA is now ready to use.
C. How ITASCA works
ITASCA: Legato Violin is designed for single melodic lines. Unlike a more typical Kontakt instrument, where playing multiple notes might result in polyphonic chords, ITASCA will instead play audio as a single
contiguous melodic line, with transition samples guiding the audio from one note to the next. When such a transition happens, it is commonly referred to as a 'legato' transition.
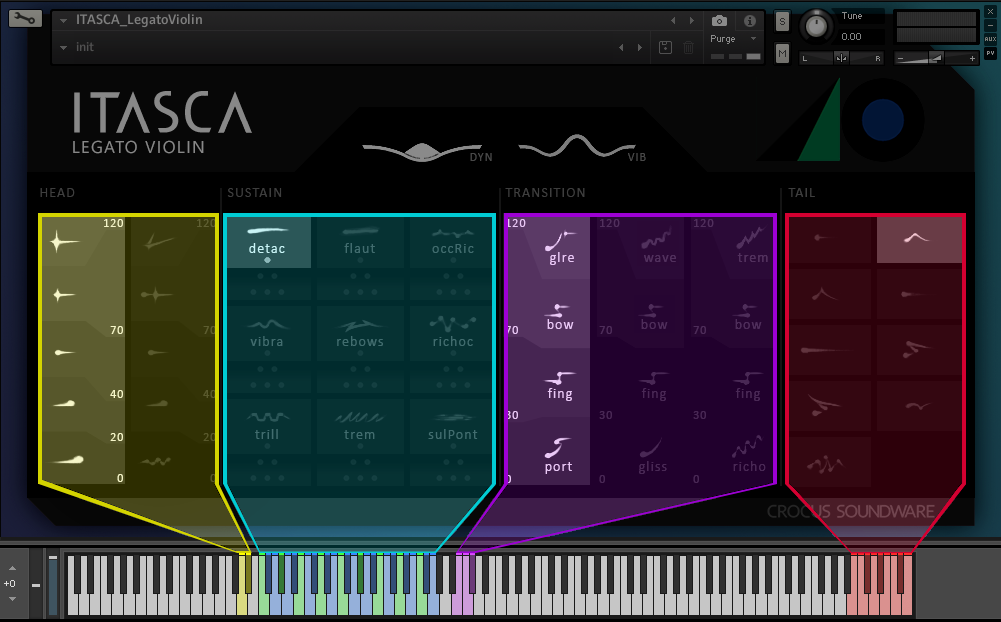
This melodic line is fundamentally constructed from 4 separate samples, which are played sequentially during the performance. These 4 samples are the HEAD, SUSTAIN, TRANSITION and TAIL. Looking at ITASCA's UI below,
you can see that these samples are represented visually from left to right, in alignment with the playback sequence. The superimposed arrows indicate the sequence.

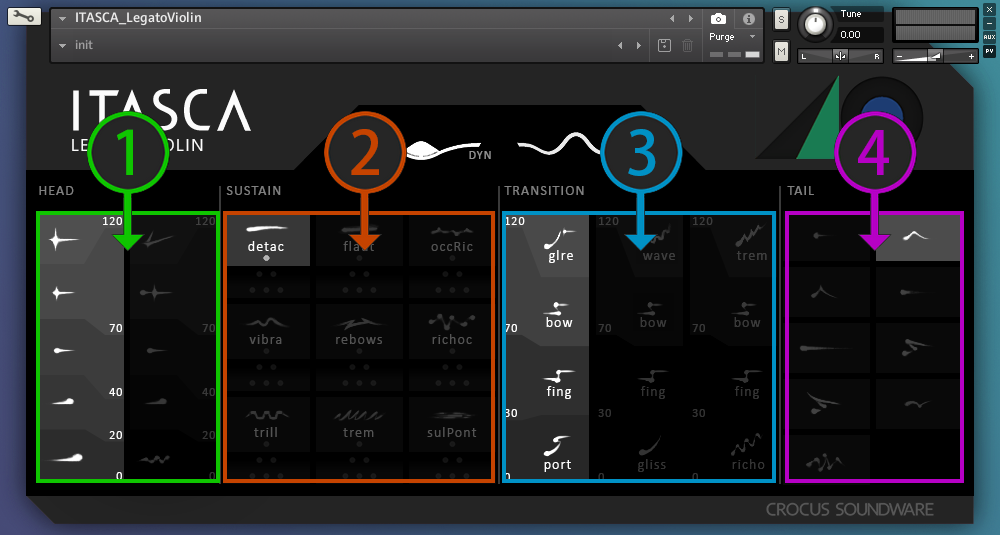
Using a combination of the UI and/or keyswitching, as well as velocity, you can control which samples are played at the various stages of the sequence. Looking at the diagram below, you can see that there are
segmentations and buttons within the categories of HEAD, SUSTAIN, TRANSITION and TAIL. We'll refer to these as palettes. Let's take a look at each palette separately.
1. HEAD Palette:
The HEAD component is effectively the 'Attack' of the note and can be have myriad sonic characteristics including accented, crescendoing, ricocheting, etc. Within the HEAD's palette, there are 2 buttons, with
each button visually segmented into 5 glyphs. These glyphs are a representation of the sonic characteristics of the samples within its respective bank. The numbers along the right edge of the button represent the
ranges of MIDI velocity required to trigger a particular sample bank. For example, a velocity between 0 and 19 will trigger a sample bank at the bottom of the palette, whereas a velocity above 120 will trigger the
top-most sample bank.
2. SUSTAIN Palette:
The SUSTAIN component is the long, looping, characterful part of the note. When a note is held, the sustain will play indefinitely. The SUSTAIN's palette
contains 27 total buttons, grouped into 9 sets of 3. The largest of these buttons contains a glyph and text which visually describe the
sonic characteristics of the samples within its respective bank. These descriptions are also applicable to the two smaller buttons immediately beneath it.
The numbers of dots on the buttons indicate the number of performers within the recorded samples in the bank. There are SOLO, DUET and TRIO banks. In total, you can have up to one SOLO bank, one DUET bank and one
TRIO bank activated at the same time. So, a bank will be deactivated if another bank is selected that has the same number of performers. Given the various combinations of SOLO, DUET and TRIO buttons, you will be able
have anywhere between 1 and 6 performers playing simultaneously.
3. TRANSITION Palette:
The TRANSITION component brings the continuous melodic line from one note to another. This can be in the form of a glissando, portamento, fingered legato or even something more creative like an ascending or
descending ricochet. The TRANSITION palette has 3 buttons and works similarly to the the HEAD palette. Each button is visually segmented into 4 glyphs, with each glyph representing a type of legato
transition.
The numbers along the left edge of a given button represent the ranges of MIDI velocity required to trigger a particular transition. For example, a velocity between 0 and 29 would trigger a portamento,
whereas a velocity between 70 and 119 would trigger and bow change.
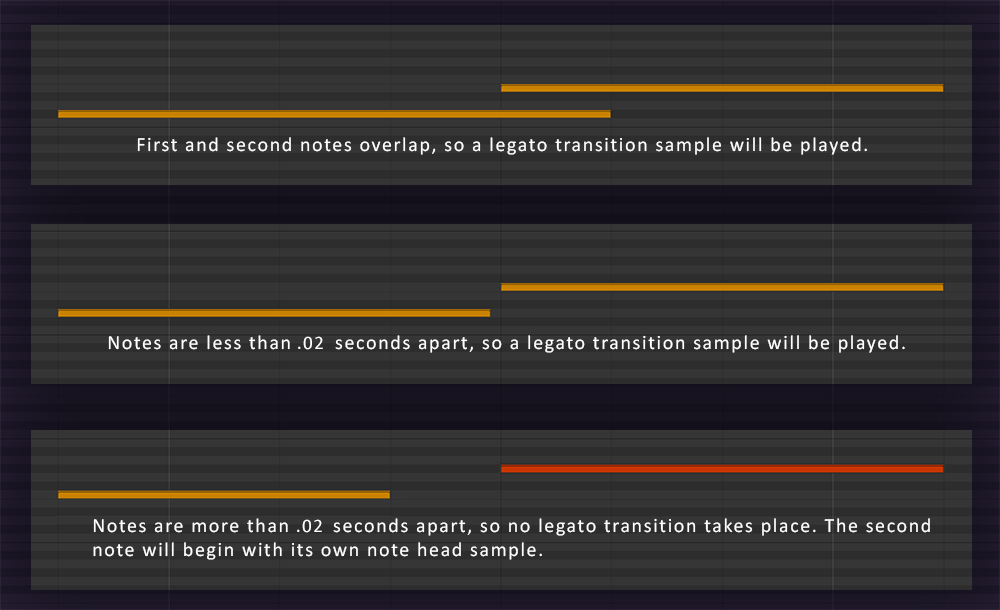
To trigger a legato transition during a performance, you can do one of two similar things. The simplest way to perform a legato transition is to overlap the end of your first note with the beginning of your next.
The MIDI velocity of the second note being relavent to the type of legato transition. So, in practice you would first press and hold a single note on the keyboard. Then, press and
hold a second key before releasing the first. If the two notes are within an octave of one another, a legato transition will play and guide the melodic line to the new note. Alternatively, if you press the second
note within 1/50th of a second of releasing the first, a legato transition will be performed. See the diagram below.
4. TAIL Palette:
The TAIL component is effectively the 'Release' of the note and can have myriad sonic characteristics including decrescendos, ricochets tails and accented rebow flourishes. These samples trigger when a key is
released or a note-off event is triggered. There are 9 tails to choose from.
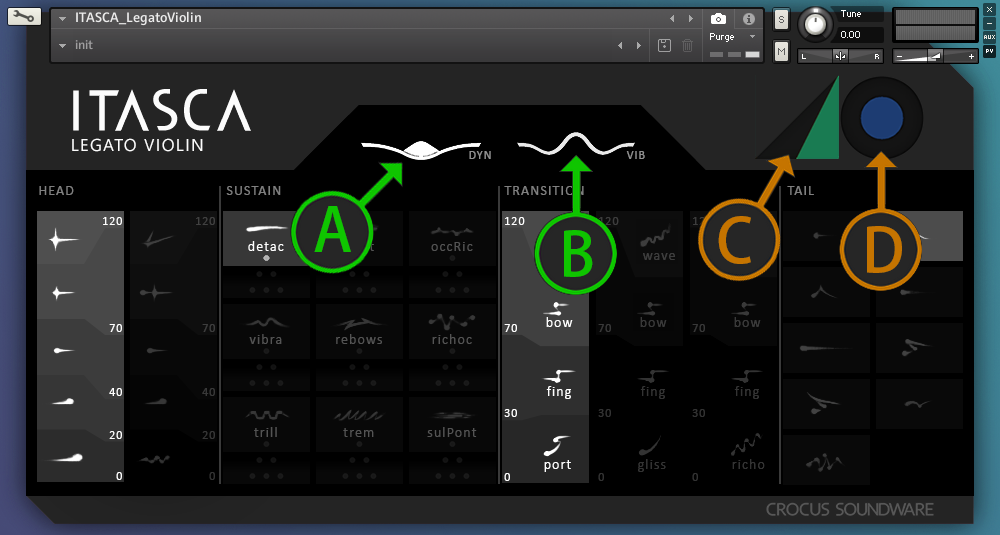
D. Additional Controls
A - Dynamics Control Knob - Connected to mod wheel
B - Vibrato Control Knob
C - Gain
D - Reverb
E. Keyswitch Functionality
In addition to using the Instrument UI to make changes to the note component palettes, you can use MIDI controller keyswitching. The colors on Kontakt's software keyboard correspond to those on the diagram below. For
the SUSTAIN palette, the green keyswitches are connected to the larger SOLO buttons and the two blue keyswitches to their immediate right are connected to that same articulation's respective DUET and TRIO buttons.