
LIMINAL's interface allows you to
activate any number sample-banks within a grid. The sample
banks are clustered in sets of 4, allowing you activate an ensemble
and/or single instrument performance(s). Ensemble performances are
labeled by a pyramid of three illuminated dots, whereas single
instruments are labeled by a single illuminated dot. You may
activate/deactivate a sample-bank by left-clicking on it.
LIMINAL is comprised of 11 "core"
articulations and 6 "processed "articulations. The "core"
articulations have been recorded closely to the microphone, with
effort made to capture as much character as possible. These banks
employ a minimal amount of post-processing - EQ, pitch correction,
noise reduction, splicing, etc. The "processed" articulations were
made by taking those same "core" recordings and mangling the audio
using myriad sound-design techniques. These 2 categories of
articulations are visually differentiated by a label and dividing
line on the LIMINAL interface. "Core" articulations are above this
dividing line, whereas "processed" articulations are below.
Each sample-bank has a set of controls which can be modified and/or
modulated independently. This is labled as 'Articulation Settings'.
To access this set of controls, click on triangular-shaped button on
the upper-left corner of a given sample-bank. This will bring up an
overlay menu, allowing you to modify parameters of the sample-bank.
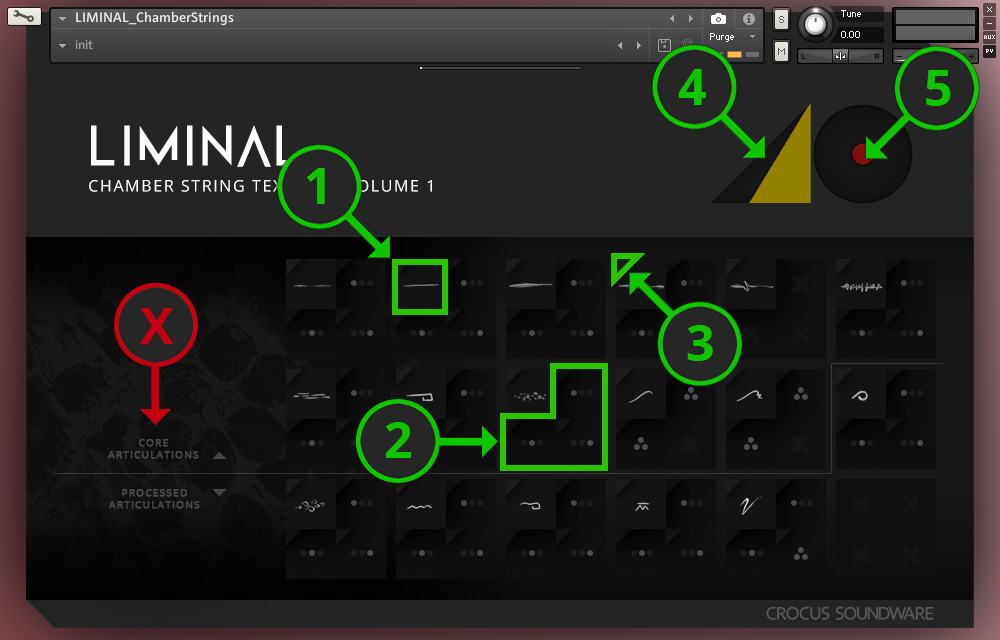
See below a diagram of LIMINAL's sample-bank selection screen.
X - Labels indicating the type of articulation relative to a dividing
line. "Core" are above, "Processed" are below.
1 - Activate an Ensemble performance sample-set for the corresponding
articulation
2 - Activate a Solo performance sample-set for the corresponding
articulation
3 - Access the 'Articulation Settings' controls for the corresponding
sample-set
4 - Master Volume control
5 - Master Reverb control

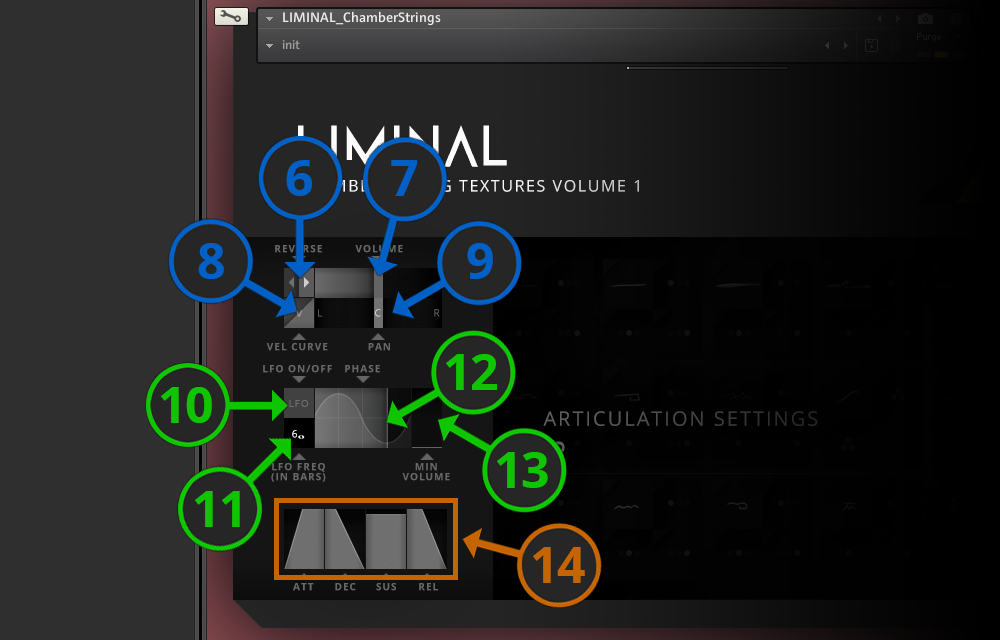
Upon engaging the 'Articulation
Settings' button, you will have access to controls shown in the
diagram below.
6 - Toggle switch to reverse playback
7 - Volume control
8 - Velocity sensitivity curve. Click-drag to adjust.
9 - Pan control
10 - Enable LFO button. This will allow the LFO to modulate volume in
relation to the host DAW's tempo
11 - LFO frequency. Click-drag to adjust. The display indicates the
number of bars to complete a single LFO cycle.
12 - LFO phase. Click-drag to adjust. The yellow line represents the
sample's start point of the cycle.
13 - Minimum Volume during the LFO cycle. Click-drag to set the volume
when the LFO wave is at it's trough.
14 - Controls for ATTACK, DECAY, SUSTAIN, RELEASE. Click-drag to
adjust

In order to install and run LIMINAL for HALion, you will need to have
HALion software installed on your computer. For this tutorial,
we'll have you install the FREE HALion Sonic SE 3.4 software, but if
you are an owner of a paid version of HALion, you should update your
software to the most recent version.
STEP 1: Go to: Steinberg
Account Signup/Login
Follow the steps to either create a new
account and/or sign in to an existing account.
STEP 2: Obtain a Halion
Sonic SE Activation Code
Go to the link and click the button
labled 'DOWNLOAD FOR FREE'. Steinberg will send you an activation
code to the email address associated with your Steinberg account.
STEP 3: Check your Email inbox (spam folder, if necessary)
Find the email from Steinberg, and make
a copy of the activation code. We
strongly recommend you ignore the download link provided in this
email. Instead, proceed to STEP 4.
STEP 4: Download
the Steinberg Download Assistant Here
STEP 5: Enter your Download Access Code
From within the Steinberg Download
Assistant software, click on the button 'Enter your Download Access
Code'. Proceed to paste or key-in the Halion Sonic SE Activation
code you received via email. Click OK. Allow the activation process
to finish.
STEP 6: Start the Download from within the Steinberg Download
Assistant
On the left pane of the Download
Assistant, you will see 'Please select a product' with numerous
product categories beneath. Select the 'VST Instruments &
Plugins' category and find and select the icon for 'HALion Sonic SE
3'. Make sure you are NOT selecting 'HALion Sonic 3' or 'HALion 6'
by mistake.
With 'HALion Sonic SE 3' selected, you will see a 'Download' option
the right pane. Click this button and allow the software to finish
downloading.
STEP 7: Click 'Open' to Install HALion Sonic SE 3
This section will provide basic information for opening LIMINAL within the HALion Sonic SE interface interface. For detailed information about operating HALion Sonic SE, you may choose to consult the HALion Sonic SE User Manual.
STEP 1 : Begin by opening HALion Sonic
SE 3.4 as either a plugin in your DAW, or through your operating
system as standalone software.
STEP 2: On the HALion Sonic SE
interface, you should see a LOAD tab. Beneath the tab, there is an
elongated rectangular button. Click on this button to access your
installed HALion libraries.
STEP 3: Find the LIMINAL 'cover-art'
and click on it to access LIMINAL's selection of presets.
STEP 4: You will now see a selection of
available LIMINAL presets in the 'media-bay'. Preset will have
a name such as 'Dry Biting Rebow A' or 'SWEELS - Biting Tremolo'.
Double-click a Preset and it will be loaded into the Program Rack on
the left of the HALion interface. You should now be able to play
LIMINAL's sounds with the on-screen Keyboard or you connected Midi
Device.
STEP 5: To access the GUI of LIMINAL,
click on the EDIT tab, which is to the right of the LOAD tab.
STEP 6: Additional Presets can be
loaded via the program controls at the top of the HALion GUI, or by
returning to the LOAD tab, and selecting another preset.
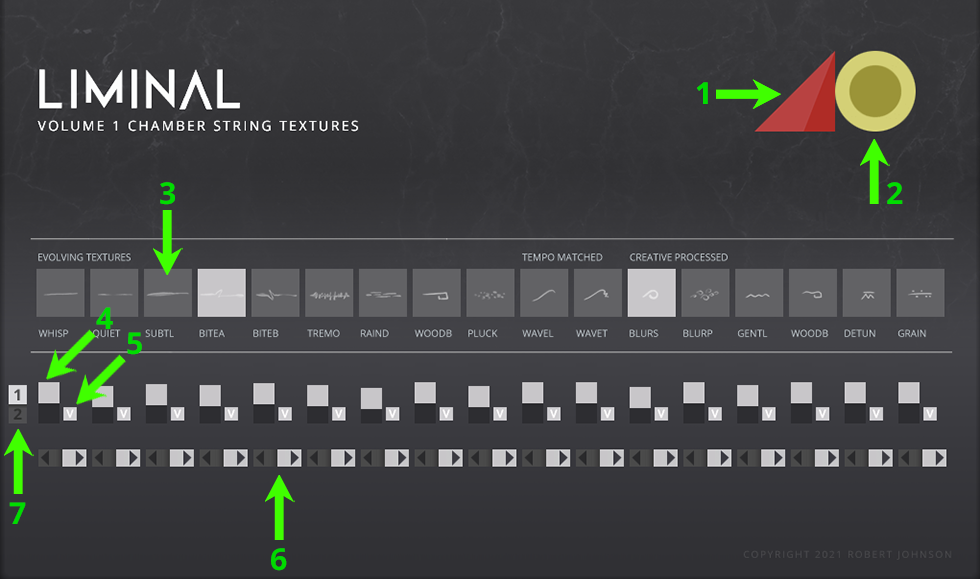
This section will provide basic information for opening LIMINAL within the HALion Sonic SE interface interface. For detailed information about operating HALion Sonic SE, you may choose to consult the HALion Sonic SE User Manual.
1 - Master Volume Control
2 - Reverb Control
3 - Articulation Selection
4 - Independent volume control for individual articulations
5 - Enable/Disable Velocity sensitivity
6 - Toggle switch to Reverse playback of individual articulation
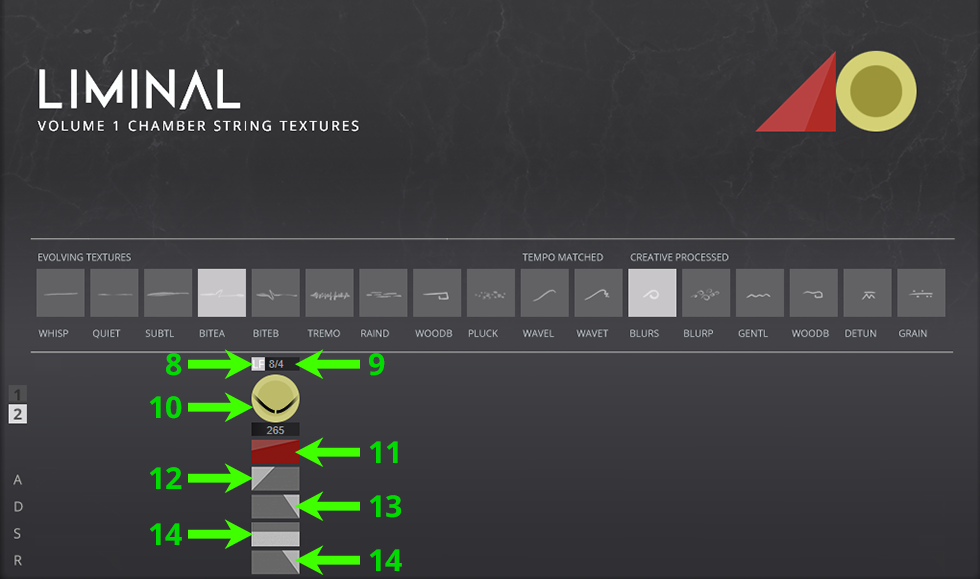
7 - Page Toggle

8 - Enable LFO, which will modulate volume in relation to the host
DAW's tempo
9 - Sets the LFO frequency
10 - Knob changes the LFO phase. The center line represents the
sample's start point.
11 - Adjustment for the mimimum volume when the LFO wave is at a
trough.
12 - Sample ATTACK
13 - Sample DECAY
14 - Sample SUSTAIN
15 - Sample RELEASE
