USER GUIDE | LIMINAL: VOCAL TEXTURES VOLUME 2
Table Of Contents
A. IntroductionB. Basic Installation
C. Installing Snapshots
D. Overview of Controls
E. Crossfade Gizmo and Layering
A. Introduction
LIMINAL: Vocal Textures Volume 1 Works with Kontakt version 6.7.1 or higher.B. Basic Installation of Kontakt edition
STEP 1 : Download the .zip file containing LIMINAL and extract it to a desired location on your computer's drive.STEP 3 : Locate the file LIMINAL_Voice.nki and execute it by either double-clicking or drag-dropping it onto Kontakt's main Rack area(typically the right pane of the Kontakt interface). LIMINAL is now ready to use.
STEP 4 : To load a Snapshot/Preset, locate the SNAPSHOTS folder and drag-drop one of the them onto the LIMINAL interface. Alternatively, you may install the snapshots by following the instructions in the next section.
C.
Installing Snapshots
STEP 2 : Click on 'Instrument Options', which should be just slightly below the wrench icon.
STEP 4 : You may be prompted to create a new Snapshots folder associated with LIMINAL. Proceed with this.
STEP 5 : An empty folder should appear. Copy all of the snapshots from the extracted .zip into to this folder.
STEP 6 : Back within Kontakt, click the wrench icon again to return to LIMINAL's user interface. The snapshots should now be accessible via Kontakt's standard Snapshot drop-down menu.
D. Overview of Controls
LIMINAL's interface allows you to
activate any number sample-banks within a grid. The sample
banks are clustered in sets of 3, allowing you activate an ensemble
and/or single instrument performance(s). Ensemble performances are
labeled by a glyphic, whereas single instruments are labeled by a
single illuminated dot. You may activate/deactivate a sample-bank by
left-clicking on it.
LIMINAL is comprised of 40 "core"
articulations. The "core" articulations have been recorded
closely to the microphone, with effort made to capture as much
character as possible.
Each sample-bank has a set of controls which can be modified and/or
modulated independently. This is labeled as 'Articulation Settings'.
To access this set of controls, click on gear-shaped button on the
upper-left corner of a given sample-bank. This will bring up an
overlay menu, allowing you to modify parameters of the sample-bank.
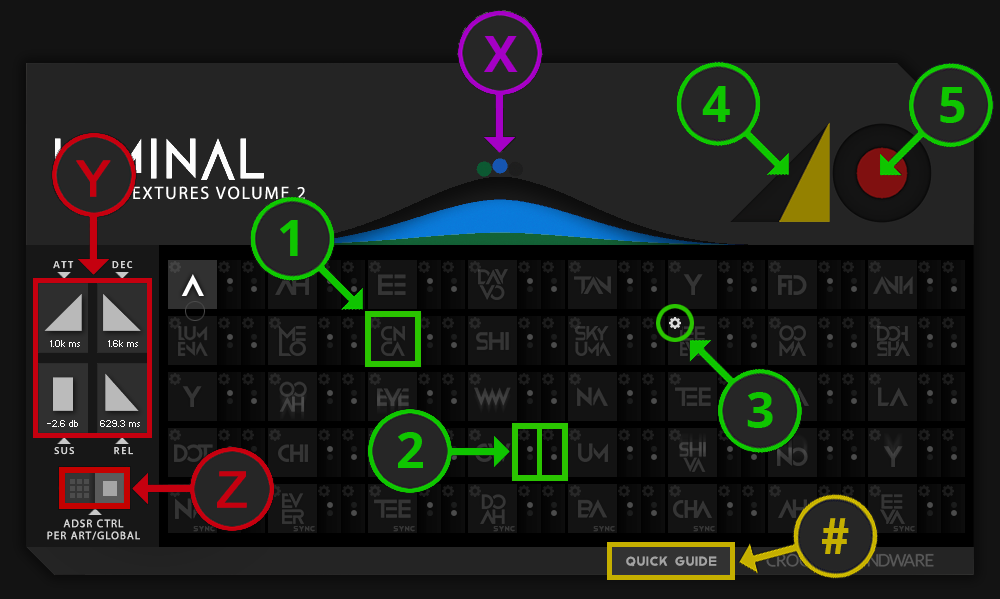
See below a diagram of LIMINAL's sample-bank selection screen.
X - Crossfade Gizmo control
Y - Instrument-wide ATTACK, DECAY, SUSTAIN and RELEASE controls
Z - Switch to toggle between per-articulation ADSR control and
Instrument-wide ADSR control
1 - Activate an Ensemble performance sample-bank for the corresponding
articulation
2 - Activate a Solo performance sample-bank for the corresponding
articulation
3 - Access the 'Articulation Settings' controls for the corresponding
sample-set
4 - Master Volume control
5 - Master Reverb control
# - Quick Guide Manual
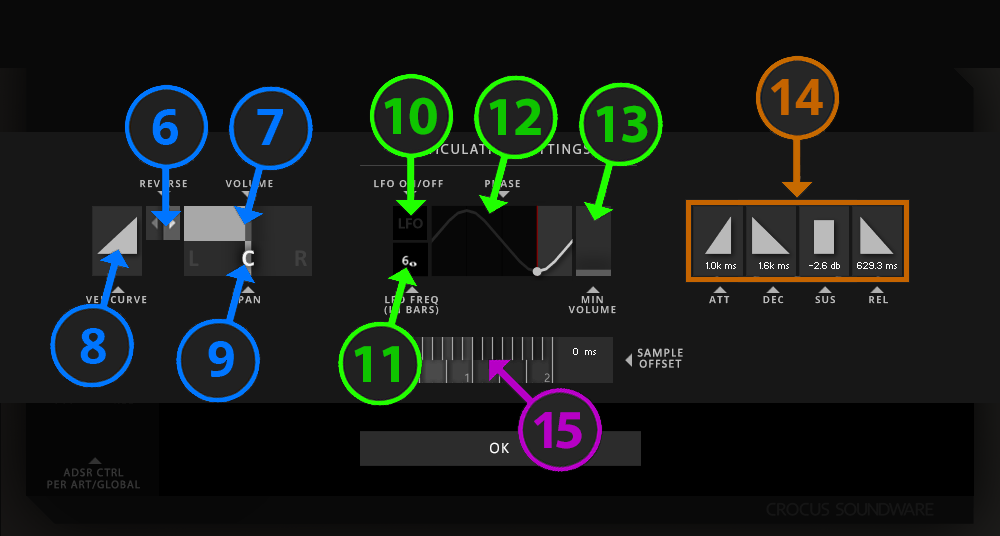
Upon engaging the 'Articulation
Settings' button, you will have access to controls shown in the
diagram below.
6 - Toggle switch to reverse playback of the sound bank
7 - Volume control of the sound bank
8 - Velocity sensitivity curve. Click-drag to adjust.
9 - Pan control
10 - Enable LFO button. This will allow the LFO to modulate volume in
relation to the host DAW's tempo
11 - LFO frequency. Click-drag to adjust. The display indicates the
number of bars to complete a single LFO cycle.
12 - LFO phase. Click-drag to adjust. The yellow line represents the
sample's start point of the cycle.
13 - Minimum Volume during the LFO cycle. Click-drag to set the volume
when the LFO wave is at it's trough.
14 - Controls for the associated articulation's ATTACK, DECAY, SUSTAIN
and RELEASE
15 - Use to offset the start position of the sample. Offset values are
in milliseconds or bars for Tempo Synced banks.
E. Crossfade Gizmo and Layering
When a Sample Bank is activated, a
LAYER knob emerges beneath the Sample Bank's glyph. This lets you
set which layer the Sample Bank belongs to. LIMINAL’S
layers are color-coded: GREEN for Layer 1, BLUE for Layer 2 and
PINK for Layer 3. By default, a layer knob's value is
undefined and has no effect - this is represented by an empty
circle. When left
undefined, the SAMPLE BANK will respond to the CROSSFADE GIZMO
as a simple 0-100% dynamics knob.

By using LAYERS, you can crossfade between multiple sample banks using the CROSSFADE GIZMO. The coloration of the CROSSFADE GIZMO corresponds to the color of a Sample Bank's defined LAYER. The proportion of color on the GIZMO is proportional to the intensity of the audio of Sample Banks with that same color. In simple terms, if a
